
MCU land, part 7: life in full color
Driving a full-color SSD1353 OLED screen and recreating a classic puzzle game on an 8-bit AVR microcontroller.
In one of the earlier articles, I talked about my quest to recreate a a variety of classic computer games on barebone 8-bit microcontrollers paired with retro displays. The projects were in no way groundbreaking, but they proved to be a great opportunity to teach my kids about game design — and to have some harmless fun.
Today, I’d like to add another chapter: an AVR128DA28-based game that pushes 8-bit tech closer to its limits by driving a full-color 160×128 OLED module (NHD-1.8-160128UBC3). This project proved to be a good opportunity to experiment with optimizations in a setting where a sane person would just reach for a 32-bit MCU. But above all, it was an excuse to properly reimplement one of my favorite classics: Sokoban.
Along with Tetris and Pac-Man, Sokoban is one of the relatively few retro games that still hold up today; alas, because it wasn’t backed by an intellectual property powerhouse, relatively few contemporary gamers are familiar with the name.
If it doesn’t ring any bells, you play a a warehouse worker who can push — but not pull - crates on a square game grid. Only one crate can be moved at once. The objective is to get all the crates to their designated locations, but if you’re not careful, it’s easy to end up with a deadlock:
The idea is deceptively simple, but later levels tend to be larger and require a lot of ingenuity to solve. And while there’s a couple of hardware clones out there, I felt that I could build a more polished package.
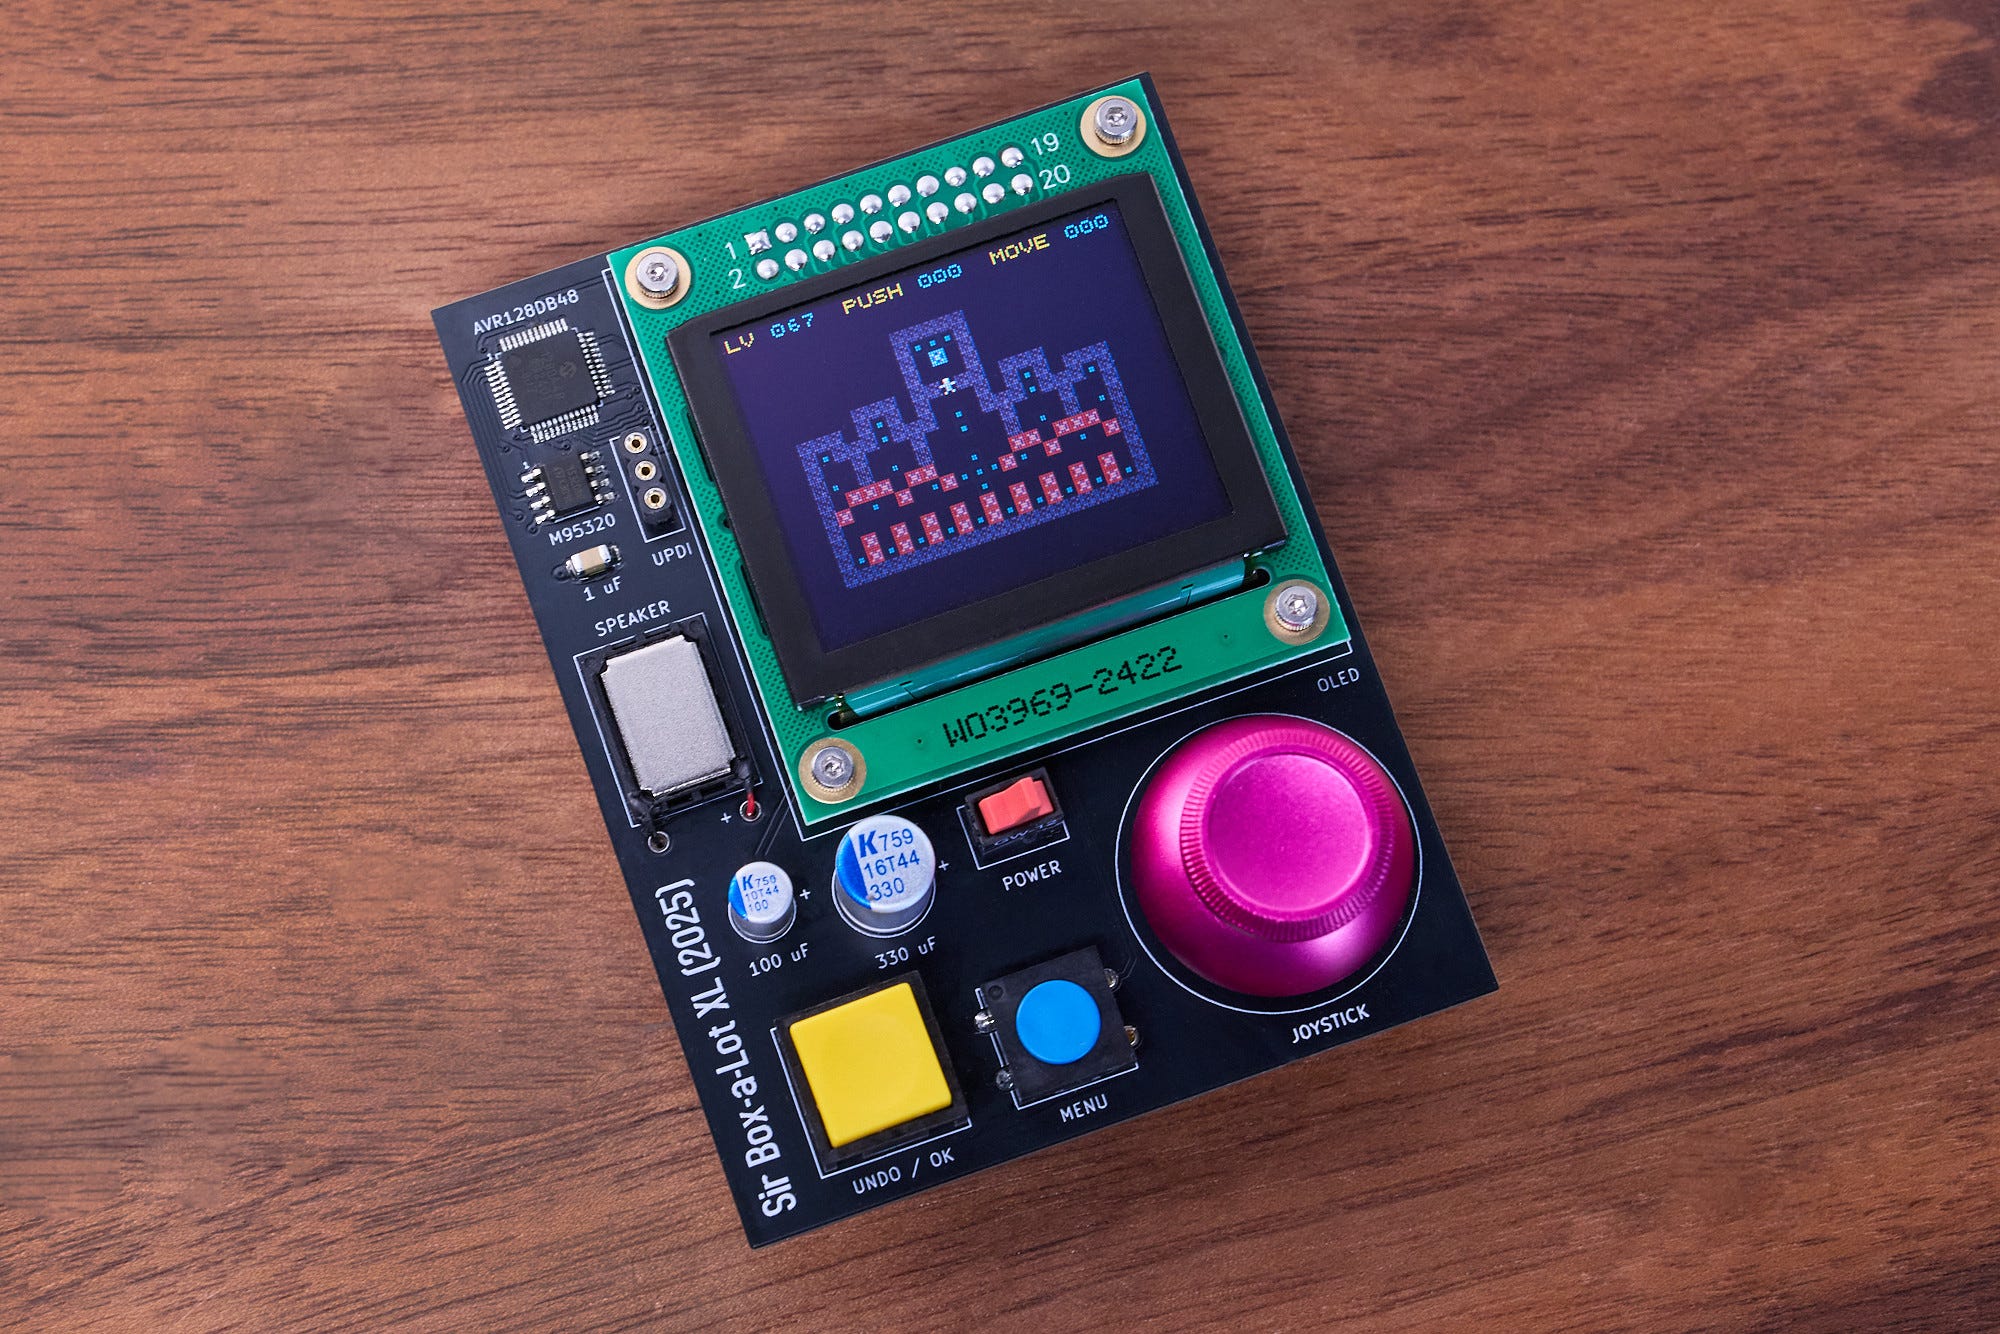
The hardware for my version — dubbed Sir Box-a-Lot — is fairly unremarkable:
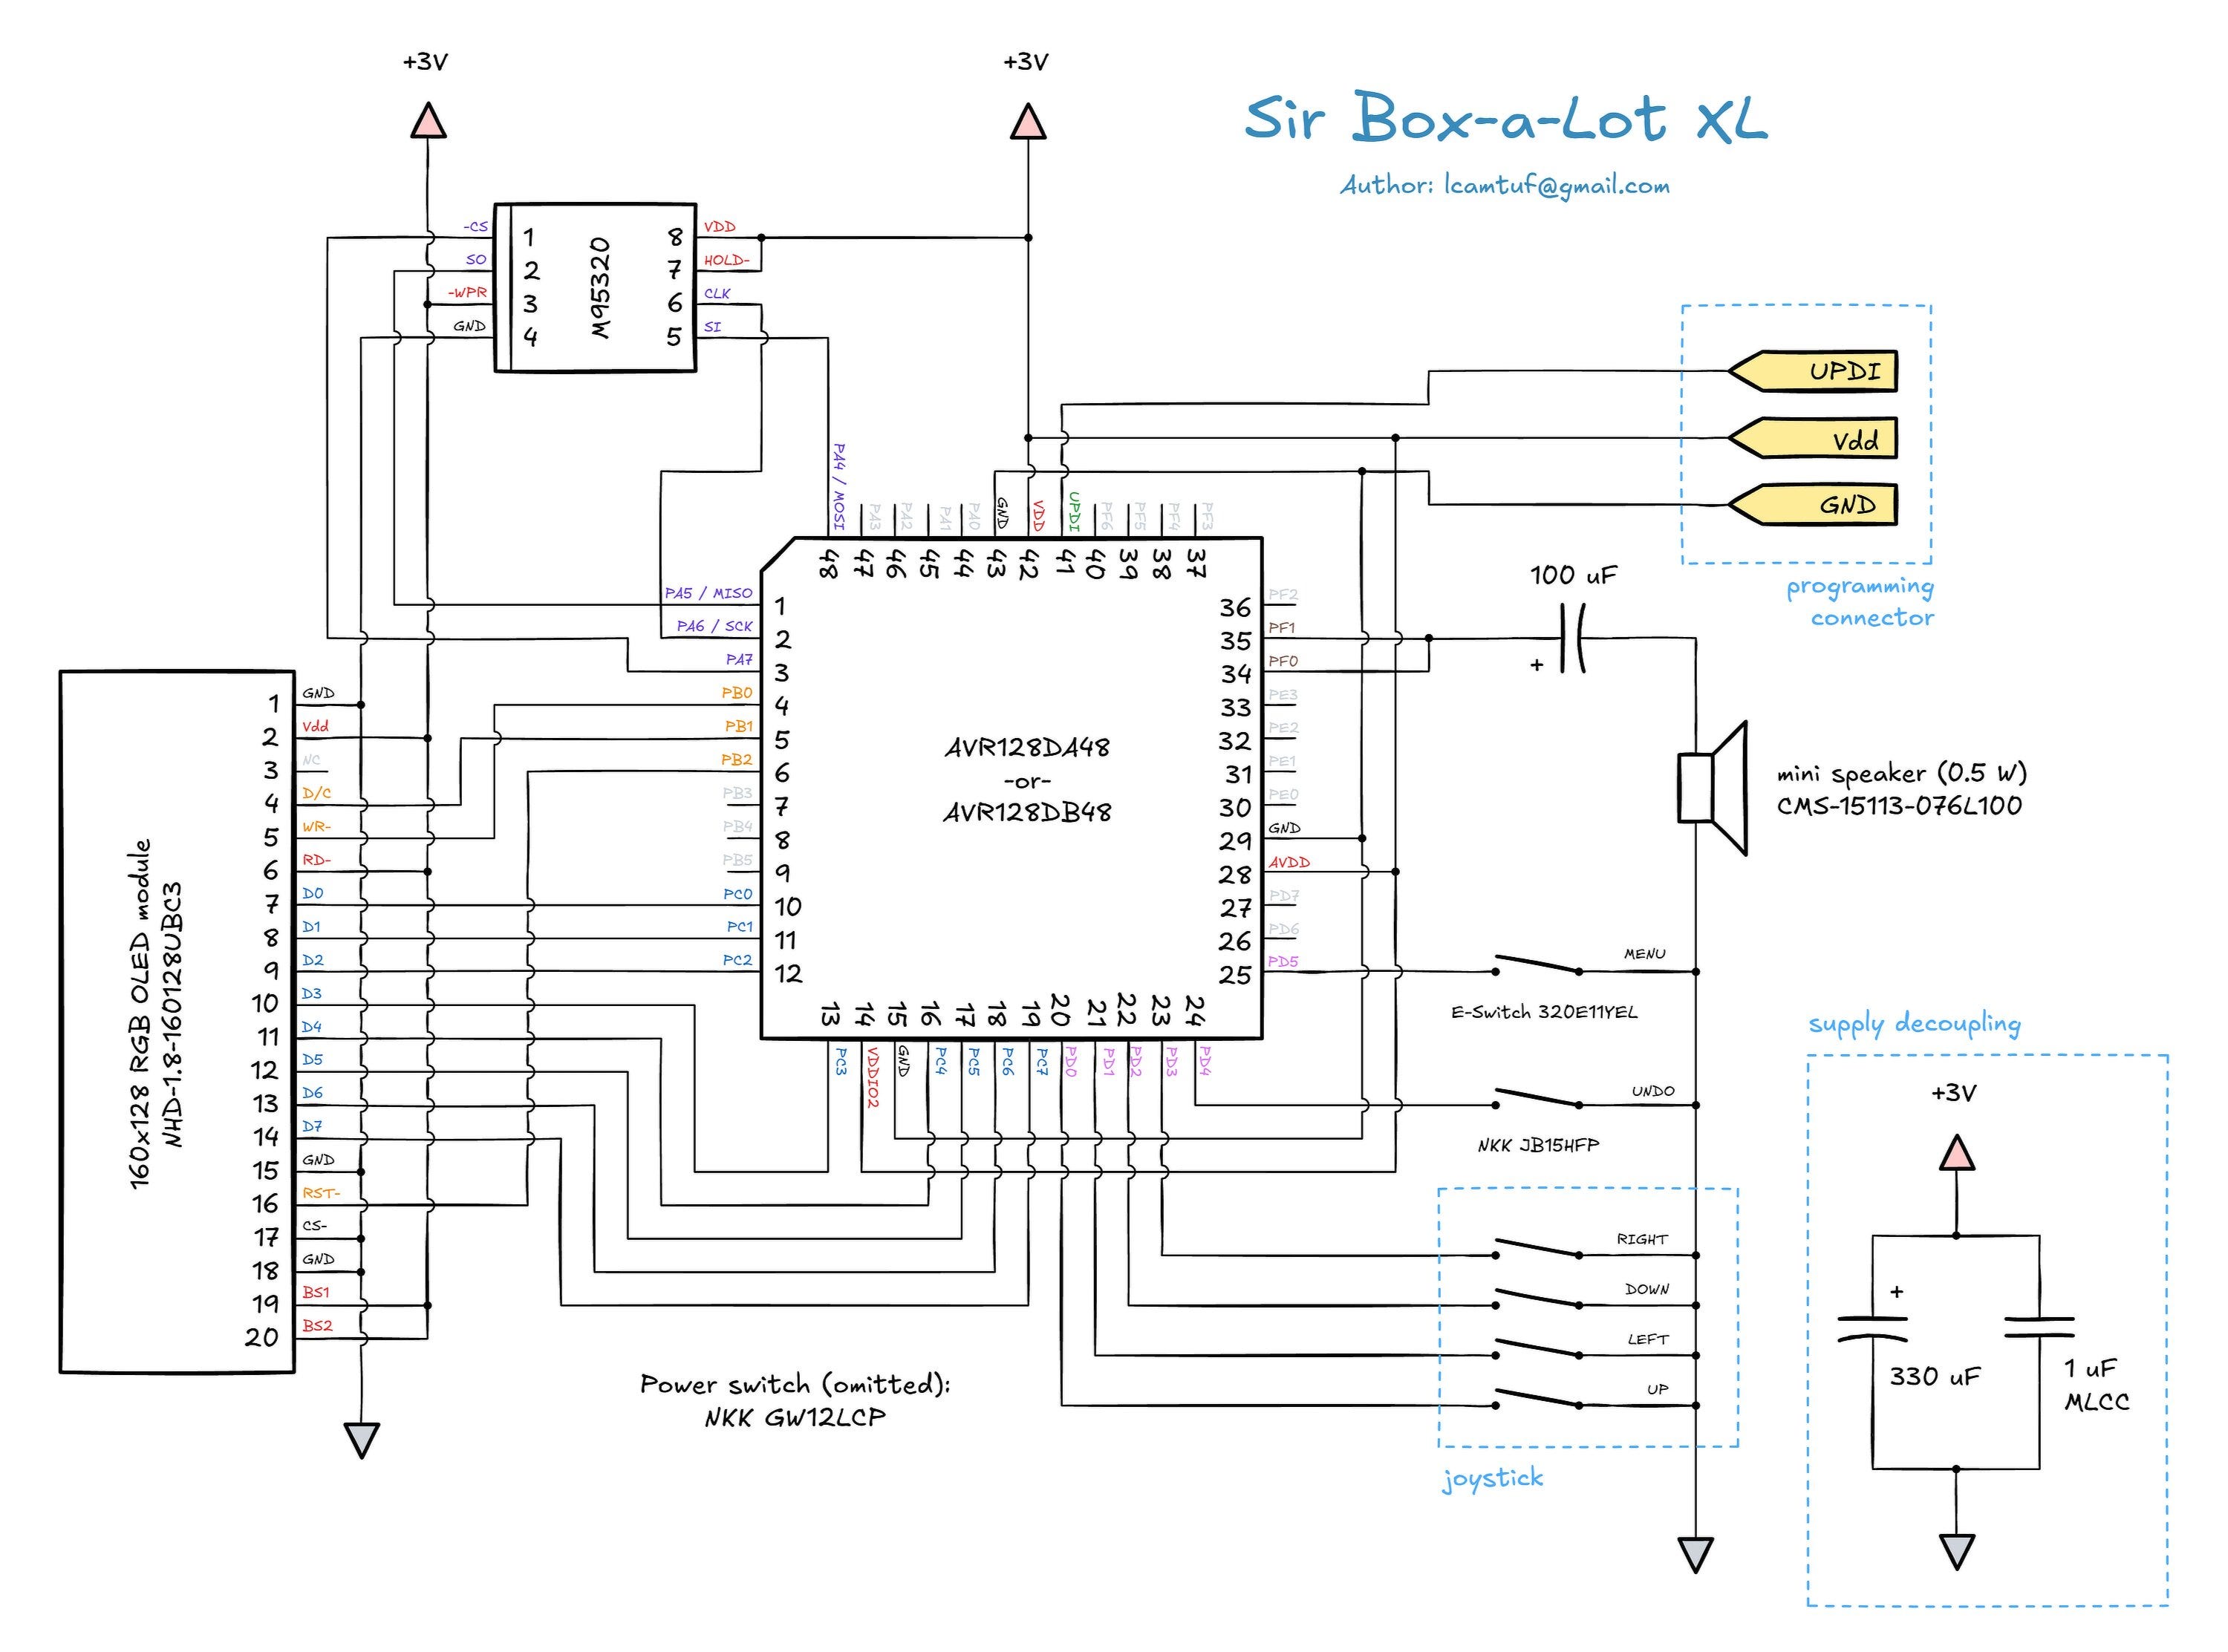
In short, there’s a couple of buttons, a speaker, and a four-contact, board-mounted “joystick” connected to the MCU in a rather textbook manner. The OLED module (or its Solomon Systech SSD1353 controller) is hooked up via the parallel “8080” interface, a scheme already discussed in an earlier post. So, let’s jump straight to the gotchas on the software side!
Making room for RGB data
Building a practical graphics stack isn’t just about putting pixels on the screen. You also need the ability to do compositing — that is, an API to place, move around, and delete logical objects on the fly. And for that, we need to keep track of what’s on the screen.
The OLED module at the heart of this project has a resolution of 160×128 RGB pixels; the color of each pixel is determined by two or three bytes of data, corresponding to the intensity of three additive primaries (red, green, and blue). The most straightforward 24-bpp implementation — known as RGB888 — requires 160 × 128 × 3 = 60 kB to represent the entire screen. A more compact 16-bpp mode supported by the display module calls for 40 kB. Either way, there’s just 16 kB of SRAM available on the AVR128DA28 MCU, so we are coming up quite a bit short. External memory, such as 23LC1024, could be the answer — but shuffling pixel data back and forth over a serial bus would add latency.
The prehistory of computing offers some lessons: in the 1980s and 1990s, engineers worked around such constraints in two clever ways. The first method relied on a reduced-size, indexed palette — akin to GIF images, each of which is constrained to 256 out of 16,777,216 possible RGB values. That said, in this case, I’d need to cut deep: 16 colors would be the safest choice that still leaves some room for other variables and stack.
The other popular trick, still alive today, is chroma subsampling: for example, on ZX Spectrum computers, a high-resolution monochrome bitmap (256×192 pixels) had a low-resolution attribute overlay that defined foreground and background colors for every 8×8 square. This scheme was efficient but restrictive: blocky artifacts cropped up whenever two differently-colored objects had to be painted in close proximity.
In the end, I decided to take a different route. I still divided the screen into a grid of 6×6 pixel cells, but instead of containing arbitrary pixel data, each of the cells can be occupied by one of up to 256 full-color sprites pulled from program memory. To make this more than a glorified text mode, each sprite cell is accompanied by an optional +/- 5 pixel rendering offset for smooth animations:
[[gnu::packed]] static struct sprite {
  u8 type:5,                     /* SPRITE_TYPE_*                */
     rgb:3;                      /* Text color (3bpp)            */
  u8 num;                        /* Sprite lookup number         */
  s8 x_off:4,                    /* X offset from grid position  */
     y_off:4;                    /* Y offset from grid position  */
} sprite_cell[26 * 21];
The “type” field also allows the use of monochrome character bitmaps in addition to RGB sprites, reusing the 6x6 font I developed for one of my earlier games; in that case, the “rgb” field is used to select one of eight supported text colors.
The savings are pretty dramatic: the total size of the array is 1.6 kB. The approach is more complicated than a pixel-level framebuffer, but it has some perks: for example, the grid can double as a level map, further reducing the game’s memory footprint. Game world objects on the screen are represented as discrete entries, easily distinguishable and trivial to move around.
Updating the display
Although the scheme is memory-efficient, it brings about another problem: some time is needed to translate the array into RGB values for the OLED module, and even more is needed to push the data out. All in all, I was looking at a refresh rate of around 10-15 fps — enough for Sokoban to be playable, but too low to achieve a polished look.
Luckily, in Sokoban and most other programs of this sort, only a small portion of the screen changes between two frames; large deltas occur only when loading new levels or exiting to a menu — and even then, most pixels remain black (or whatever is your favorite background color).
Consequently, as an optimization, the code keeps track of modified (“dirty”) cells, automatically flagging them from within sprite manipulation and text handling routines. For example, the following routine is used to place a new RGB sprite on the grid:
void place_rgb(u8 cell_x, u8 cell_y, u8 sprite_no, s8 x_off, s8 y_off) {
  struct sprite *s = get_cell(cell_x, cell_y);
  mark_clean(cell_x, cell_y);
  s->type  = SPRITE_TYPE_RGB;
  s->num   = sprite_no;
  s->x_off = x_off;
  s->y_off = y_off;
  mark_dirty(cell_x, cell_y);
}
These dirty cells are then automatically picked up by a 10 kHz interrupt routine, then incrementally shipped off to the OLED and marked as clean. The process is essentially transparent to the rest of the code: any changes to the sprite grid just magically appear on the screen. Because the OLED module has an internal memory buffer, the remaining regions are preserved frame-to-frame.
Implementing undo
Many Sokoban moves can lead to deadlocks, so modern clones of the game usually have an “undo” button. This user-friendly feature allows the player to backtrack without having to restart the level over and over again.
The lazy way of implementing undo is to take a snapshot of game state, and then restore it down the line. Alas, for Sokoban, the state is the entire map; with 1.6 kB per snapshot, even with compression, I wouldn’t be able to keep a whole lot of movement history.
A more nuanced solution is to keep a journal of individual state changes, and then play them back in reverse. This, too, is somewhat complicated for Sokoban. Multiple things can happen in a single step: in addition to player movement, a crate may be pushed to a new location. When that happens, the crate may become “solved”, swallowing a target marker and changing its own color; it may become “unsolved”, spawning a marker in its wake; or it might glide across multiple target markers clustered next to each other. Players traversing across markers trigger similarly messy state changes, too.
In the end, I didn’t want to implement complex journaling, so I settled on another trick. In Sokoban, the effects of a move span at most three cells in a straight line extending from the player’s starting position. My undo implementation saves and restores these three cells, plus some gameplay stats. This buys me 200 undo levels for just 1.6 kB of RAM:
[[gnu::packed]] static struct undo_state {
  u8 cx:6, cy:6,              /* Cell segment starting coordinates */
     vertical:1,              /* Cell segment orientation          */
     ...
  u8 cells[3];                /* Cell values prior to movement     */
} undo_stack[UNDO_DEPTH];
Sourcing and storing levels
Sokoban level design is a form of art I can’t imitate, but luckily, there are thousands of community-designed designs available on the internet.
After some playtesting, I initially settled on Sokoban Jr 1 and Sokoban Jr 2 level sets hosted by Borgar Thorsteinsson as a part of his GPL-licensed, web-based implementation of the game. Borgar’s website doesn’t provide attribution for these sets, but based on some other internet hits, I suspect they might have been created by Laura Wheeler. If that’s the case, she did a darn good job: it’s a varied set well-suited for kids, and virtually all the levels are small enough to fit on Sir Box-a-Lot’s game grid.
The “junior” levels are pretty but not exceptionally challenging, so I later extended the platform with additional, higher-difficulty level sets by David W. Skinner (Sasquatch, Mas Sasquatch, Sasquatch III) and Aymeric du Peloux (Microcosmos, Nabocosmos), thus putting the total at 300.
To cram three hundred levels into the chip’s flash memory, I used a very simple and readable packing approach to encode two map cells per byte: the first four bits (i.e., the first hex digit) correspond to the item in the first cell; the next four describe the next cell. Much tighter packing is possible but unnecessary; the current levels take up about 100 kB out of the MCU’s 128 kB.
A more serious constraint is EEPROM, used to store high scores. For every level, I’m recording three types of achievements, taking up four bytes total. The AVR128DA28 chip has 512 bytes of EEPROM, so I would be maxing it out with just 100 levels in tow:
[[gnu::packed]] struct level_rec {
  u8  solved_by:4,           /* Player who solved this level first */
      best_pushes_by:4,      /* Player with the lowest push count  */
      best_moves_by:4;       /* Player with the lowest move count  */
  u16 best_pushes:10,        /* Lowest push count                  */
      best_moves:10;         /* Lowest move count                  */
};
The MCU has the ability to self-program its flash memory, so we could abuse this for additional storage; that said, given that almost all the flash is already being used, it’s safer to add a standalone 4 kB SPI EEPROM IC (STM M95320).
And now, the moment you’ve all been waiting for!
Here’s a quick video showing Sir Box-a-Lot v1 in action on a prototyping board; I was recording myself, with the game mounted in a vise to minimize unintended movements, so please accept my apologies for the uninspired takes.
The PCB version, shown earlier, looks far more polished; that said, the video captures the device’s animations and sounds.
Was it worth it? A pragmatic person would probably say “no”. I invested several hours of work to deal with the limitations of an 8-bit platform when it’d cost me $2 more to use a 32-bit Cortex-M4 MCU with ten times as much built-in SRAM (e.g., ATSAMG55J19A).
At the same time, I did not have to do anything weird or fundamentally hard; the code is pretty simple, maintainable, and its RGB OLED handling primitives can be reused for more essential projects down the line. Plus, there’s some satisfaction in reviving an 8-bit classic on a modern-day 8-bit MCU.
👉 All the code, PCB production files, and schematics are available here. For yet another gaming project, click here. To check out earlier MCU- and electronics-related articles on this blog, please visit this page.
I write well-researched, original articles about geek culture, electronic circuit design, and more. If you like the content, please subscribe. It’s increasingly difficult to stay in touch with readers via social media; my typical post on X is shown to less than 5% of my followers and gets a ~0.2% clickthrough rate.